
In this article, I will show how you can deploy your application using Docker and the continuous delivery options of Gitlab.
At the end of the article, you should have an application that is deployed on a dedicated server, and optionally, each new branch of your application will create a new environment (with a dedicated URL) to access your application.
Jan. 26th, 2018:
- Replaced use of
CI_COMMIT_REF_NAMEwithCI_COMMIT_REF_SLUGto deal correctly with branches containing slashes
- Added comment about possible race conditions
- Added comment about usage of YAML anchors
Why?
Continuous delivery allows you to test your application on a server, in almost real time. Your application deployment is automated and completely driven from Gitlab so:
- there are no manual tasks involved when you want to put a new version of your application in production (so no manual error)
- you can test your application in an environment close to production before putting the application in production
- the cost of deploying in production is dramatically lowered. You can make way more deployments than you would in a traditional application
- each branch gets its own environment so you can check the result of pull requests easily
Does it work?
Yes! In the case you are wondering, this very blog (thecodingmachine.io) is deployed using this technique.
What we will achieve
In this blog, we will deploy a PHP application.
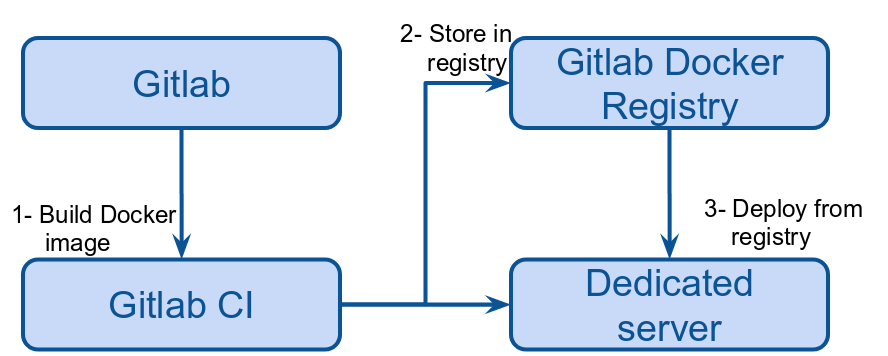
We will:
- Create a Docker image containing the application
- Store the Docker image in the Gitlab registry
- Deploy from the registry, on a dedicated server using Docker and Traefik
Is this state of the art?
Let's be cristal clear. This is not state-of-the-art. If you want to be a big boy, you would clearly use Gitlab integration with Kubernetes to deploy your applications directly in the cloud.
Instead, we will be deploying our application on a single dedicated server.
Using Kubernetes, we could do:
- load-balancing
- high availability
- auto scaling
So why am I deploying on a single server? Well... it's cheaper, obviously!
As I'm writing this article, I can have a very beefy Core i7 with 64Go RAM and 500Go SSD for about €100. The same machine in a Kubernetes environment would cost me about 4 times more.
To be perfectly clear: I wouldn't use this technique for a mission critical application, but for a website like this blog, it's perfect!
Also, I don't have to add the cognitive load of Kubernetes to an already fairly complex stack.
What we need
So, what do we need to get started?
- an application to deploy! In this example, I'll be deploying this very blog. You can check the source-code here.
- a Gitlab 10+ server
- a Gitlab CI 10+ server (for continuous integration/delivery)
- a dedicated server (I'll assume it's running Ubuntu 16.04 LTS, but really, any Linux OS will do)
In Gitlab, the container registry must be enabled. In Gitlab Runner (CI), the runner must be configured in "privileged mode".
In the rest of this article, I'll assume you have already a basic knowledge of Gitlab CI, Docker and PHP.
As you will see, it's not really difficult, but there are a lot of steps involved to get this working. If you want to try it, expect spending at least 1 or 2 days of work to have this working.
Building the images
Let's get started by building the image.
The Docker image we build will be based on the PHP+Apache image provided by Docker et will contain our complete source code, with all Composer dependencies.
Dockerfile (must be hosted at the root of your project)
FROM php:7.1-apache-jessie

# Let's install Git and Zip (for Composer)
RUN apt-get -y update && apt-get install -y zlib1g-dev git
RUN docker-php-ext-install opcache mbstring zip

# Let's install composer
ENV COMPOSER_ALLOW_SUPERUSER 1

RUN curl -sS https://getcomposer.org/installer | php -- --install-dir=/usr/local/bin --filename=composer &&\
    chmod +x /usr/local/bin/composer

# Do specific stuff like enabling PHP extensions, etc...
# ...

# Copy all the project to the root directory
COPY . /var/www/html/

RUN composer install
Storing the image in the Container Registry
This image will be built by Gitlab CI and then stored in Gitlab's container registry.
To do this, Gitlab CI must be allowed to
To do this, we will create a .gitlab-ci.yml file.
build_image:
  image: docker:git
  services:
  - docker:dind
  variables:
    DOCKER_DRIVER: overlay
  script:
  - docker login -u gitlab-ci-token -p $CI_BUILD_TOKEN registry.mygitlabserver.com
  - docker build -t registry.mygitlabserver.com/group/project/image:${CI_COMMIT_REF_SLUG} .
  - docker push registry.mygitlabserver.com/group/project/image:${CI_COMMIT_REF_SLUG}
  only:
  - branches
Let's break it in parts:
  image: docker:git
  services:
  - docker:dind
  variables:
    DOCKER_DRIVER: overlay
We are starting a special "Docker" image with the DIND (Docker in Docker) service. This allows us to build a Docker image from the Docker image we are in (Inception!)
We use the "overlay" driver for performance reason.
  script:
  - docker login -u gitlab-ci-token -p $CI_BUILD_TOKEN registry.mygitlabserver.com
  - docker build -t registry.mygitlabserver.com/group/project/image:${CI_COMMIT_REF_SLUG} .
  - docker push registry.mygitlabserver.com/group/project/image:${CI_COMMIT_REF_SLUG}
Here is where the magic happens. First, we log into our registry. In this example, the registry URL is "registry.mygitlabserver.com". Of course, you will adapt this to your environment.
We use the special user "gitlab-ci-token" with the special password $CI_BUILD_TOKEN. This is a trick by Gitlab CI to allow login into the registry from the CI environment.
Just after, we run the Docker build. Notice the name of the image after the "-t" parameter.
You must replace "group" with the group of your Gitlab project, "project" with the name of your Gitlab project. Finally, you can replace "image" with anything you want.
In my case, my project is "tcm-projects/thecodingmachine.io" and I'm building a default "blog" image. My image name is therefore: registry.thecodingmachine.com/tcm-projects/thecodingmachine.io/blog:${CI_COMMIT_REF_SLUG}
If you are wondering, the ${CI_COMMIT_REF_SLUG} in Gitlab CI maps to the name of the current branch, but slugified. So for the master branch, my full image name is registry.thecodingmachine.com/tcm-projects/thecodingmachine.io/blog:master.
And if I have a feature/foobar branch, ${CI_COMMIT_REF_SLUG} will be feature-foobar (notice how the slash was replaced by an hyphen)
If you want to learn more, checkout the relevant Gitlab documentation.
  only:
  - branches
Finally, the last section is telling Gitlab CI to build the images only for branches. You can of course change this to create a new image for each tag if you want.
Let's assume a developer pushes 2 commits (commit A, then commit B), at a few seconds of interval. Since many builds can run at the same time, build A and build B will run concurrently. If for some reason, build B takes less time than build A, we will push on the registry build B first, then build A will overwrite build B (which is completely unexpected).
One way to avoid this issue is to tag the image with the commit SHA (rather than with the branch name). This way, the generated image will be tagged with a unique ID. The pitfalls of this is that each commit will generate its own image (it takes space!) Also, this is useful only with continuous delivery (where deployment is manual). In case of continuous deployment (i.e. automated deployment), we still have the same issue where one job can outspeed another branch during the deployment phase.
Configuring the dedicated server
So far, when we push a new branch, a new image will be created and stored in Gitlab container registry. What we now want to do is take this image and deploy it on our dedicated server.
Let's start by setting up the server.
Installing Docker
The first step is obviously to install Docker on the server (we are assuming you are using a Ubuntu server here).
Follow installation steps in the Docker documentation.
Creating a user
Now, let's create a dedicated user that Gitlab CI will use to connect to the server. We will call this user deployer.
We add this user to the docker group. That way, the user can start and stop containers without requiring root access.
$ sudo adduser deployer
$ sudo groupadd docker
$ sudo usermod -aG docker deployer
Creating a public/private key
Finally, we need to create a private/public key for this user and give the private key to Gitlab CI.
We put the public key in the authorized_keys file to allow access to the user using the matching private key.
$ su deployer
$ ssh-keygen -t rsa

(when asked for a passphrase, enter no passphrase)

$ # Let's allow someone else to connect to this user, remotely using the key we generated
$ cp ~/.ssh/id_rsa.pub ~/.ssh/authorized_keys
Now, let's copy the private key into Gitlab (so that Gitlab CI can connect to the server and deploy the new application).
$ cat ~/.ssh/id_rsaCopy the content of the file.
In Gitlab 10, in your project page, go to: Settings > CI/CD > Secret variables.
Create a new variable named SSH_PRIVATE_KEY, whose value is the content of the ~/.ssh/id_rsa on your server.
echo $SSH_PRIVATE_KEY).
So anyone with commit rights has actually access to your server. This might be a concern (especially for large projects with a lot of developers). If this is a concern to you, you can restrict this variable
to protected branches, or you can simply use another more "robust" deployment mechanism like Kubernetes.Finally, from the host machine, run:
$ ssh-keyscan mydedicatedserver.comThis will output your server's public key (it is different from the public key you just generated). This public key typically goes in the "known_hosts" file of the client. By keeping track of this public key, we are avoiding man-in-the-middle-attacks.
Copy this public key.
In Gitlab's CI/CD secret variables settings, create a new variable named SSH_KNOWN_HOSTS, and paste the public key of the server.
You can find more information about using SSH with Gitlab CI in the Gitlab documentation.
Setting up Traefik
We will start containers on the dedicated server. We will start one container per branch. Of course, we need a way to tell the server to root the HTTP requests to the correct container.
For instance, requests to thecodingmachine.io should go to the main container (on the master branch) while requests to foobar.tests.thecodingmachine.io should go to the foobar branch.
Doing this kind of routing is the role of a reverse proxy. And there is one great reverse proxy for Docker: Traefik!
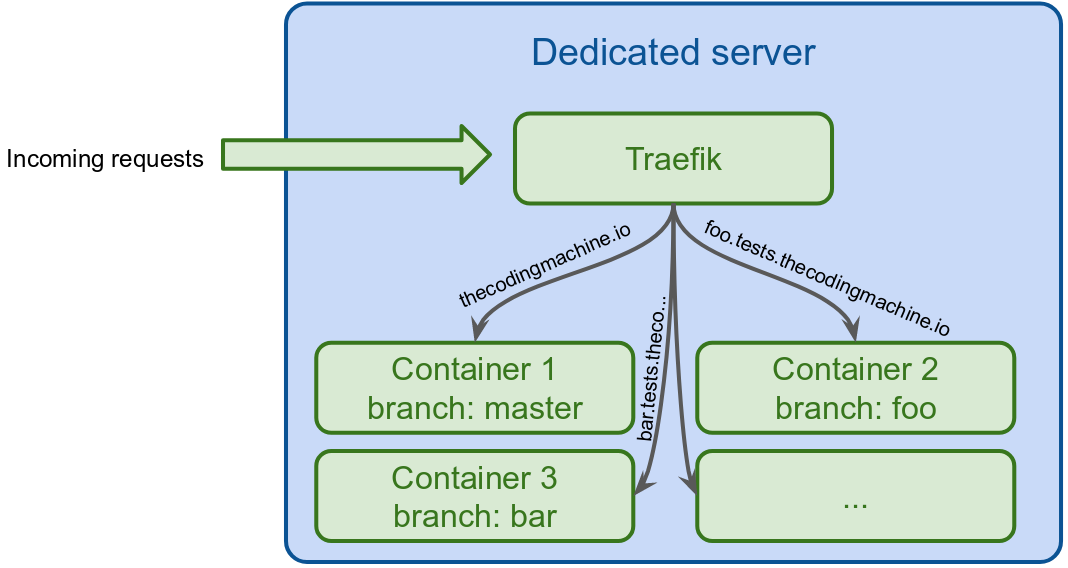
Since we are using Docker, we will deploy Traefik on the dedicated server using Docker.
Let's put everything in the /opt/traefik directory.
$ sudo mkdir -p /opt/traefikFor Traefik to work, we need a dedicated Docker network. Let's create it and call it web:
docker network create webNow, let's create a docker-compose.yml file in our Traefik directory.
/opt/traefik/docker-compose.yml
version: '2'

services:
  traefik:
    image: traefik:1.4.6
    restart: always
    ports:
      - 80:80
      - 443:443
    networks:
      - web
    volumes:
      - /var/run/docker.sock:/var/run/docker.sock
      - ./traefik.toml:/traefik.toml
      - ./acme.json:/acme.json
    container_name: traefik

networks:
  web:
    external: true
Let's add the traefik.toml configuration file:
/opt/traefik/traefik.toml
debug = true
checkNewVersion = true
logLevel = "ERROR"
defaultEntryPoints = ["https","http"]

[entryPoints]
  [entryPoints.http]
  address = ":80"
    [entryPoints.http.redirect]
    entryPoint = "https"
  [entryPoints.https]
  address = ":443"
  [entryPoints.https.tls]

[retry]

[docker]
endpoint = "unix:///var/run/docker.sock"
domain = "thecodingmachine.io"
watch = true
exposedbydefault = false

[acme]
email = "notifications@thecodingmachine.io"
storage = "acme.json"
entryPoint = "https"
OnHostRule = true
Notice: you need to change the root domain (thecodingmachine.io) and the email (notifications@thecodingmachine.io) in your configuration.
[acme] section is relative to Let's encrypt integration. It is used by Traefik to automatically create SSL certificates for your website.
Traefik handles HTTPS. Your container can simply server HTTP pages on port 80, as usual.Finally, we need to create an empty "acme.json" file that will be used by Traefik to store the generated certificates:
$ touch /opt/traefik/acme.json
$ chmod 600 /opt/traefik/acme.json
Done?
Let's start Traefik!
$ cd /opt/traefik
$ docker-compose up -d
If you want to learn more, checkout the Traefik documentation.
Routing HTTP requests to the right container
HTTP requests coming to Traefik need to be routed to the right container. We usually do this based on the host name.
As said previously, requests to thecodingmachine.io should go to the main container (on the master branch) while requests to foobar.tests.thecodingmachine.io should go to the foobar branch.
This means that you need to configure your DNS so that thecodingmachine.io and *.tests.thecodingmachine.io point to the same IP address.
If you don't have an easy access to your DNS records (or if you cannot easily set up wildcard DNS records), you might instead use xip.io.
Xip.io is a magic domain name that provides wildcard DNS for any IP address.
thecodingmachine.io IP address is "188.165.179.81". Well 188.165.179.81.xip.io points to "188.165.179.81".
Even better: foobar.188.165.179.81.xip.io also points to "188.165.179.81".
So for my branch foobar, I can create and deploy a container, and configure Traefik to route all incoming routes from foobar.[my-ip-address].xip.io to the container. And we are done!
Configuring images from Traefik
Traefik works with Docker labels. When a container starts, it analyzes its labels, and it routes the requests to this container based on the labels.
Labels can be added directly on a container, or can be embedded in an image.
I chose to put them in the image (but putting them in the container is ok too).
Dockerfile
#...
#...

LABEL traefik.backend=${CI_ENVIRONMENT_SLUG:-master} traefik.frontend.rule=Host:${CI_ENVIRONMENT_SLUG:-www}.tests.thecodingmachine.io traefik.docker.network=web traefik.enable=true traefik.port=80 traefik.default.protocol=http
Here, we set up 6 labels:
traefik.frontend.rule=Host:${CI_ENVIRONMENT_SLUG:-www}.tests.thecodingmachine.io: this is the rule used to route incoming requests to this container. Here, the rule isHost:${CI_ENVIRONMENT_SLUG}.tests.thecodingmachine.io.${CI_ENVIRONMENT_SLUG}is an environment variable created by Gitlab CI, unique for this environment (it is in fact a "slugified" version of the branch name).traefik.backend=${CI_ENVIRONMENT_SLUG:-master}: this is simply the "name" of the targeted container in Traefik. It can really be anything but should be unique for your container (otherwise you are going to perform load-balancing)traefik.docker.network=web: this is the name of the Docker network to use to access this containertraefik.enable=true: self-explanatorytraefik.port=80: the container listens on port 80traefik.default.protocol=http: the container is using the HTTP protocol
Deploying our application automatically
With Traefik set up and our containers containing the correct labels, we can now work on the "continuous deployment".
We will edit our .gitlab-ci.yml file to add additional stages:
.gitlab-ci.yml
stages:
  - build
  - deploy

build_image:
  stage: build
  image: docker:git
  services:
  - docker:dind
  variables:
    DOCKER_DRIVER: overlay
  script:
    - docker login -u gitlab-ci-token -p $CI_BUILD_TOKEN registry.thecodingmachine.com
    - docker build -t registry.thecodingmachine.com/tcm-projects/thecodingmachine.io:${CI_COMMIT_REF_SLUG} .
    - docker push registry.thecodingmachine.com/tcm-projects/thecodingmachine.io:${CI_COMMIT_REF_SLUG}
  only:
    - branches

deploy_staging:
  stage: deploy
  image: kroniak/ssh-client:3.6
  script:
    # add the server as a known host
    - mkdir ~/.ssh
    - echo "$SSH_KNOWN_HOSTS" >> ~/.ssh/known_hosts
    - chmod 644 ~/.ssh/known_hosts
    # add ssh key stored in SSH_PRIVATE_KEY variable to the agent store
    - eval $(ssh-agent -s)
    - ssh-add <(echo "$SSH_PRIVATE_KEY")
    # log into Docker registry
    - ssh deployer@thecodingmachine.io "docker login -u gitlab-ci-token -p $CI_BUILD_TOKEN registry.thecodingmachine.com"
    # stop container, remove image.
    - ssh deployer@thecodingmachine.io "docker stop thecodingmachine.io_${CI_COMMIT_REF_SLUG}" || true
    - ssh deployer@thecodingmachine.io "docker rm thecodingmachine.io_${CI_COMMIT_REF_SLUG}" || true
    - ssh deployer@thecodingmachine.io "docker rmi registry.thecodingmachine.com/tcm-projects/thecodingmachine.io:${CI_COMMIT_REF_SLUG}" || true
    # start new container
    - ssh deployer@thecodingmachine.io "docker run --name thecodingmachine.io_${CI_COMMIT_REF_SLUG} --network=web -d registry.thecodingmachine.com/tcm-projects/thecodingmachine.io:${CI_COMMIT_REF_SLUG}"
  only:
    - branches
  except:
    - master
First thing to notice: there is a stages section:
stages:
  - build
  - deploy

build_image:
  stage: build
  # ...
  # ...

deploy_staging:
  stage: deploy
  # ...
  # ...
We declare 2 stages: build and deploy. Stages are run sequentially: all jobs belonging to the build stage must succeed for the jobs on the deploy stage to start.
We actually have only one job in each stage.
The build_image job is therefore run first, and the deploy_staging job is run is the build_image job succeeds.
In the Gitlab user interface, jobs and stages can be viewed easily:

Let's now take a closer look at the deploy_staging job:
# ...

deploy_staging:
  stage: deploy
  image: kroniak/ssh-client:3.6
  script:
    # add the server as a known host
    - mkdir ~/.ssh
    - echo "$SSH_KNOWN_HOSTS" >> ~/.ssh/known_hosts
    - chmod 644 ~/.ssh/known_hosts
    # add ssh key stored in SSH_PRIVATE_KEY variable to the agent store
    - eval $(ssh-agent -s)
    - ssh-add <(echo "$SSH_PRIVATE_KEY")
    # log into Docker registry
    - ssh deployer@thecodingmachine.io "docker login -u gitlab-ci-token -p $CI_BUILD_TOKEN registry.thecodingmachine.com"
    # stop container, remove image.
    - ssh deployer@thecodingmachine.io "docker stop thecodingmachine.io_${CI_COMMIT_REF_SLUG}" || true
    - ssh deployer@thecodingmachine.io "docker rm thecodingmachine.io_${CI_COMMIT_REF_SLUG}" || true
    - ssh deployer@thecodingmachine.io "docker rmi registry.thecodingmachine.com/tcm-projects/thecodingmachine.io:${CI_COMMIT_REF_SLUG}" || true
    # start new container
    - ssh deployer@thecodingmachine.io "docker run --name thecodingmachine.io_${CI_COMMIT_REF_SLUG} --network=web -d registry.thecodingmachine.com/tcm-projects/thecodingmachine.io:${CI_COMMIT_REF_SLUG}"
The base image is a kroniak/ssh-client. It is a bare image with only a SSH client installed.
Then, we perform 3 tasks:
- registering the "known host public key" and the "SSH private key" (so that Gitlab CI can SSH into the server)
- remove old running containers
- starting new container
Importing the known host and the SSH private key
    - mkdir ~/.ssh
    - echo "$SSH_KNOWN_HOSTS" >> ~/.ssh/known_hosts
    - chmod 644 ~/.ssh/known_hosts
Here, we are creating a known_hosts file and adding our server in it.
Without the known_hosts file, SSH would ask us whether the server is legitimate or not:
The authenticity of host 'thecodingmachine.io (188.165.179.81)' can't be established.
RSA key fingerprint is c6:ee:c6:e4:9a:b6:7e:46:4c:17:b4:d0:7b:80:af:2c.
Are you sure you want to continue connecting (yes/no)?
Of course, since we are in a CI container, we cannot afford any interaction with the build process.
By writing the known_hosts file, we tell SSH that our host is legitimate.
StrictHostKeyChecking no
in SSH config file. Never do this! as it leaves you open to man-in-the-middle attacks (MITM).Let's now deal with the private key:
eval $(ssh-agent -s)
ssh-add <(echo "$SSH_PRIVATE_KEY")
Here, we are starting the SSH agent (the SSH agent is in charge of managing authentications via public/private keys).
Then, we register our private key. Remember that we stored the private key as a Gitlab secret environment variable ($SSH_PRIVATE_KEY)?
Well at this stage, we use this environment variable to register the private key.
Starting the new container
We start the container with this single line:
ssh deployer@thecodingmachine.io "docker run --name thecodingmachine.io_${CI_COMMIT_REF_SLUG} --network=web -d registry.thecodingmachine.com/tcm-projects/thecodingmachine.io:${CI_COMMIT_REF_SLUG}"Let's break this in tiny bits:
- we run a command on the server using
ssh deployer@thecodingmachine.io "[command]". - the command we run is
docker runto start our newly built image. - we pass 3 parameters:
--name: we set the container name to something unique. This is important because we will use this container name to stop the container (more on this later)--network=web: the container must run on the "web" docker network-d: we want the container to run as a daemon (in the background)
You might have noticed that before running the container, we call commands to connect to our registry and to stop the containers.
    - ssh deployer@thecodingmachine.io "docker login -u gitlab-ci-token -p $CI_BUILD_TOKEN registry.thecodingmachine.com"
    - ssh deployer@thecodingmachine.io "docker stop thecodingmachine.io_${CI_COMMIT_REF_SLUG}" || true
    - ssh deployer@thecodingmachine.io "docker rm thecodingmachine.io_${CI_COMMIT_REF_SLUG}" || true
    - ssh deployer@thecodingmachine.io "docker rmi registry.thecodingmachine.com/tcm-projects/thecodingmachine.io:${CI_COMMIT_REF_SLUG}" || true
This part of the script is:
- logging the user into our registry
- stopping the container (
docker stop) if it is started - removing the container (
docker rm) if it exists - removing the container image (
docker rmi) if it exists
If you are wondering, the || true makes sure that any error happening while stopping a container is ignored. This is
needed because if this is the first time we start the container, there is no container to shut down.
At this point, we are successfully deploying a new website each time a branch is created, and this website is updated on each push.
But there is still a problem. So far, we have no way to delete a website when a branch is destroyed. As we create more branches, we will stack environments on our server up to the point where the server won't start at all.
This is where Gitlab environments kick in.
Using Gitlab CI environments
Gitlab ships with a notion of "CI environment". An environment is a simple reference to a deployed version of your application.
Let's modify our .gitlab-ci.yml file to add environment support:
deploy_staging:
  stage: deploy
  image: kroniak/ssh-client:3.6
    # add the server as a known host
    - mkdir ~/.ssh
    - echo "$SSH_KNOWN_HOSTS" >> ~/.ssh/known_hosts
    - chmod 644 ~/.ssh/known_hosts
    # add ssh key stored in SSH_PRIVATE_KEY variable to the agent store
    - eval $(ssh-agent -s)
    - ssh-add <(echo "$SSH_PRIVATE_KEY")
    # log into Docker registry
    - ssh deployer@thecodingmachine.io "docker login -u gitlab-ci-token -p $CI_BUILD_TOKEN registry.thecodingmachine.com"
    # stop container, remove image.
    - ssh deployer@thecodingmachine.io "docker stop thecodingmachine.io_${CI_COMMIT_REF_SLUG}" || true
    - ssh deployer@thecodingmachine.io "docker rm thecodingmachine.io_${CI_COMMIT_REF_SLUG}" || true
    - ssh deployer@thecodingmachine.io "docker rmi registry.thecodingmachine.com/tcm-projects/thecodingmachine.io:${CI_COMMIT_REF_SLUG}" || true
    # start new container
    - ssh deployer@thecodingmachine.io "docker run --name thecodingmachine.io_${CI_COMMIT_REF_SLUG} --network=web -d registry.thecodingmachine.com/tcm-projects/thecodingmachine.io:${CI_COMMIT_REF_SLUG}"
  environment:
    name: review/$CI_COMMIT_REF_NAME
    url: http://${CI_ENVIRONMENT_SLUG}.tests.thecodingmachine.io
    on_stop: stop_staging
  only:
    - branches
  except:
    - master

stop_staging:
  stage: deploy
  variables:
    GIT_STRATEGY: none
  script:
    # add the server as a known host
    - mkdir ~/.ssh
    - echo "$SSH_KNOWN_HOSTS" >> ~/.ssh/known_hosts
    - chmod 644 ~/.ssh/known_hosts
    # add ssh key stored in SSH_PRIVATE_KEY variable to the agent store
    - eval $(ssh-agent -s)
    - ssh-add <(echo "$SSH_PRIVATE_KEY")
    # log into Docker registry
    - ssh deployer@thecodingmachine.io "docker login -u gitlab-ci-token -p $CI_BUILD_TOKEN registry.thecodingmachine.com"
    # stop container, remove image.
    - ssh deployer@thecodingmachine.io "docker stop thecodingmachine.io_${CI_COMMIT_REF_SLUG}" || true
    - ssh deployer@thecodingmachine.io "docker rm thecodingmachine.io_${CI_COMMIT_REF_SLUG}" || true
    - ssh deployer@thecodingmachine.io "docker rmi registry.thecodingmachine.com/tcm-projects/thecodingmachine.io:${CI_COMMIT_REF_SLUG}" || true
  when: manual
  environment:
    name: review/$CI_COMMIT_REF_NAME
    action: stop
  only:
    - branches
  except:
    - master
Two things to notice:
- There is a new
environmentsection - There is a new job named
stop_staging
The environment section has 3 parameters:
name: review/$CI_COMMIT_REF_NAME: this is the display name of the environmenturl: http://${CI_ENVIRONMENT_SLUG}.tests.thecodingmachine.io: the URL of the environment (only used to provide a link to your deployment)on_stop: stop_staging: a reference to a job that will be called to stop the environment
When the environment section is added in .gitlab-ci.yml, Gitlab will automatically create a new "environment" in the "Environments" page of your project:
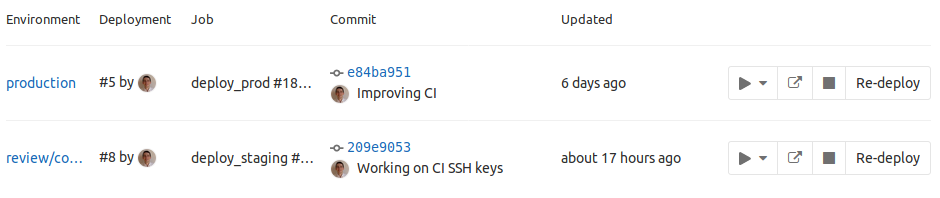
Please note that you can stop an environment at any time using the "stop" button and that Gitlab is also offering you a link to the environment.
Stopping environments
The stop_staging job is called:
- if the branch is removed
- or if the user clicks the "stop" button in the "Environments" page.
This job is actually very similar to the deploy_staging job. Here are the key differences:
stop_staging:
  stage: deploy
  when: manual
  variables:
    GIT_STRATEGY: none
  environment:
    name: review/$CI_COMMIT_REF_NAME
    action: stop
  script:
    # ...
    # ...
    # ...
when: manual: this ensures that the job will not run automatically. It is triggered either manually from the Gitlab UI, or when the branch the job is based on is deleted.GIT_STRATEGY: none: when this job is run, the files from the repository are not available in the CI environment. Why? Because if this job is triggered by a deleted branch, the branch does not exist and therefore cannot be checked-out.environment: we must declare again the environment here with a matching name, and the parameteraction: stop.
deploy_staging and stop_staging are very similar (both
script sections are identical excect "stop" doesn't run the docker start part), it would make a lot of
sense to write a template for both scripts. YAML comes with the concept of anchors,
but these anchors cannot be applied to arrays (and the "script" section is an array of commands). Hopefully, there is
already an issue opened at Gitlab about this and
it might be possible to use YAML aliases in the near future to remove duplicate content from our .gitlab-ci.yml
files.
Conclusion
There is nothing really complex about configuring a project to perform continuous delivery on a dedicated server. A lot of tiny details need to be mastered and configuring such a project takes time. If this is the first time you are attempting such a configuration, do not expect to do this in less than a day of work.
There are dozens of solutions for deploying applications in the cloud, and the one I present in this article (SSH on a dedicated server) is probably the most basic one. If you have more advanced needs, do not hesitate to check Docker swarm or Kubernetes for "production-grade" deployments. And even if you finally decide to go with another deployment option, the first part of this guide (regarding building images in CI) will still prove to be useful.
Happy coding!
About the author
David is CTO and co-founder of TheCodingMachine and WorkAdventure. He is the co-editor of PSR-11, the standard that provides interoperability between dependency injection containers. He is also the lead developper of GraphQLite, a framework-agnostic PHP library to implement a GraphQL API easily.